
Note 1: Composing the preprocessing images
Create a Master Bias image:
- Process | Stack ...
- Deselect Auto Calibrate, Auto Color Convertert and Make Pixel square
- Click on the button Add Files ... and select all the images to be composed.
- In the tab Quality, deselect all Criteria
- Click on the button Aling
- Mode: None
- Click on the button Combine
- Combine Method : Sigma-Clip
- SigmaFactor : 3 or 2 (do both)
- Select ignore Black Pixels
- Normalization : None
- Click on GO
- Click on the button Close
- Queue | Save : file name for example Master Bias - Bin 1 × 1 -20 Celsius-Sigma 3
- Compare the Sigma image 3 and 2 and choose the best image. Always favor the Sigma 3 image (which rejects fewer pixels). If there are cosmic rays or other parasites present, then choose the Sigma 2 image.
For Master Bias, the images should not be normalized. Until August 2019, I used the compositing method Average to produce my Master Bias. But, in August 2019, during the up-to-date production of my Bias Master, there was a cosmic ray that entered one of my Bias images. Using the Sigma Clip compositing method with filter 3 (Sigma Factor above), it was removed. For this reason, I now recommend using the Sigma-Clip compositing method to produce the Bias Master. For more information on the Sigma-Clip, click on lien.
Create a Black Master image:
- Process | Stack ...
- Deselect Auto Calibrate, Auto Color Convertert and Make Pixel square
- Click on the button Add Files ... and select all the images to be composed.
- In the tab Quality, deselect all Criteria
- Click on the button Aling
- Mode: None
- Click on the button Combine
- Combine Method : Sigma-Clip
- SigmaFactor : 3 or 2 (do both)
- Select ignore Black Pixels
- Normalization : None
- Click on GO
- Click on the button Close
- Queue | Save : file name for example Black Master - Bin 1 × 1 - 600 sec -20 Celsius-Sigma 3
- Compare the Sigma image 3 and 2 and choose the best image. Always favor the Sigma 3 image (which rejects fewer pixels). If there are cosmic rays or other parasites present, then choose the Sigma 2 image.
For the Black Master, one should not normalize the images.
Create a PLU master image:
- Process | Stack ...
- Deselect Auto Calibrate, Auto Color Convertert and Make Pixel square
- Click on the button Add Files ... and select all the images to be composed.
- In the tab Quality, deselect all Criteria
- Click on the button Aling
- Mode: None
- Click on the button Combine
- Combine Method : Sigma-Clip
- SigmaFactor : 3 or 2 (do both)
- Select ignore Black Pixels
- Normalization : Linear
- Click on GO
- Click on the button Close
- Queue | Save : file name for example Master PLU - Bin 1 × 1 - Blue - 20 sec -20 Celsius-Sigma 3
- Compare the Sigma image 3 and 2 and choose the best image. Always favor the Sigma 3 image (which rejects fewer pixels). If there are cosmic rays or other parasites present, then choose the Sigma 2 image.
For the Master PLU, as for the images of the deep sky, it is necessary to normalize the images. Normalization is used to set the same intensity level to all pixels before combining.
Note 2: Pretreatment
- Create a subdirectory Pretreatment.
- Copy | To stick on all images (raw images, Master Bias, Master Dark, Master Flat) in this directory.
- File | Open ... Open all the raw deep sky images to calibrate. Images must come from the directory Pretreatmentt.
- Process | Set Calibration ...
- Source Folder : Select the directory Pretreatment and click on OKAY.
- Click on the button Auto-Generate (ClearOld).
- The 3 preprocessing images will appear.
- Click on Advanced Calibration.
- Configure as follows:
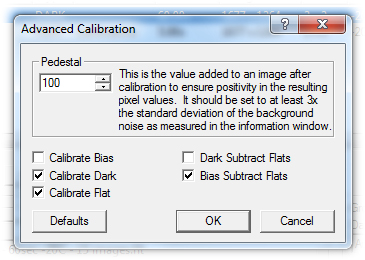
- This configuration will be according to the stated formula: Calibrated image = (Raw image - Black1) / (PLU - Bias)
- Click on OK to close the window Advanced Calibration
- Click again on OK to close the window Set Calibration
- Process | Calibrate All
- Queue | Save All
Note 3: Composing calibrated images
- Process | Stack ...
- Deselect Auto Calibrate, Auto Color Convertert and Make Pixel square
- Click on the button Add Files ... and select all the images to be composed.
- In the tab Quality, deselect all Criteria
- Click on the button Aling
- Mode: Auto - Star Matching
- Click on the button Combine
- Combine Method : Sigma-Clip
- SigmaFactor : 3 or 2 (do both)
- Select ignore Black Pixels
- Normalization : Linear
- Click on GO
- Click on the button Close
- Queue | Save : file name for example IC434-Ha-Bin 1 × 1-Sigma 3
- Compare the Sigma image 3 and 2 and choose the best image. Always favor the Sigma 3 image (which rejects fewer pixels). If there are cosmic rays or other parasites present, then choose the Sigma 2 image.
Note: for two-star alignment, select Translate + Rotate
Note 4: Resize from Bin 2 × 2 to Bin 1 × 1
- Open the image to resize
- To change from Bin 2 × 2 to bin 1 × 1:
- Process | Double Size
Note 5: Alignment of LRV and B images
This process will align the LRV and B images making it easier to stitch them together (compositing) later in Photoshop.
- Open the 4 LRGB images to be aligned.
- The image of Luminance must be the first image.
- Process | Align…
- add All and click on OK
- Align Fashion : To select Auto - Star Matching
- Click on the button OK
- Queue | Save All
- The 4 images are aligned and saved
- Go to the directory and manually rename the images starting with align…
We therefore have in the end 4 images preprocessed and aligned LRV and B. The processing of these images will be done with Photoshop and PixInsight.
Richard Beauregard
Sky Astro - CCD
Revised 2021/01/16