
Note 1 - Open with Fit Liberator
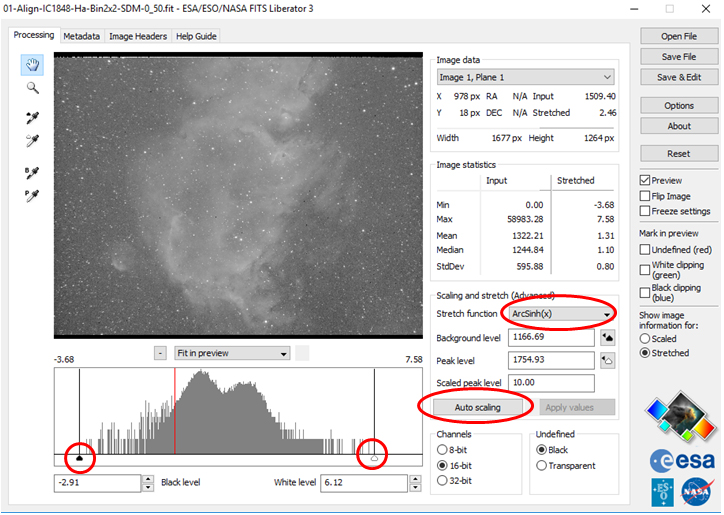
If your images are in FIT (monochrome), Photoshop does not support this format. The software FIT Liberator can be used to open this type of file with Photoshop. I recommend using it because it allows you to open images while preserving all the values of the image's histogram in both the lightest and darkest shades, thus ensuring that the sky background will not be "clogged" and that the brightest stars will not be overexposed. Personally, I always open the image with the calibration applied Strech Function à ArcSinH (x),with a Self-scaling and making sure that the slider for the brightest values in the histogram is greater than these (to the right) and that of the darker values is less than these values (to the left) as shown in the following image:
Note 2- Black and White point adjustment
If there is a gradient in the image, perform treatment # 1. Then, apply treatment # 2 in the following link:
Note 3- Assembling the RGB image
- With Photoshop, open files your image Rouge.tif, Vert.tif and Bleu.tif
- We have to choose an image as a basis for our work. Let's use the Red image considering that the Green or Blue image could also be used. Click on the picture Red.tif and convert it to RGB by selecting Image | Fashion | RGB colors.
- Click on the picture Vert.tif to make it active. Selection | Select all and then Edition | Copy
- Click on the picture Red.tif to make it active
- Open the window Layers and click on the Green Layer to make it active only:

- Paste the image Vert.tif in the green layer by selecting Edition | To stick on
- Repeat procedures 3 to 6 for the image Blue.tif.
- Make all layers active by activating the eye for each one. From this moment we have an RGB composite image
- Save Red.tif in .tif format and give it the name Your name RGB.tif
- Close images Green.tif et Blue.tif
Note 4- Work done with curves
Apply treatment # 3 in the following link:
Note 5- Color balance using curves
Click on this lien.
Note 6- Luminance and RGB assembly
Click on this lien and go to section Joining the Luminance image with the RGB color image.
Note 7- Other treatments
Consult the sections Processing deep sky images et Advanced treatments (consult the submenus) to see other treatments to improve the image. It can be a matter of removing imperfections in the image, making unsightly colors disappear from the sky background, removing noise from the sky background, etc.
Note 8- Increase image sharpness
Apply treatment # 13 in the following link:
Richard Beauregard
Sky Astro - CCD
Revised 2021/05/03