For the photography of emission nebulae, it is recommended to produce the luminance image with the Hydrogen-Alpha (H-Alpha) filter. This filter will bring out all the contrasts and nuances of the gases and dust of the nebula for the reason that they emit the majority of their luminosity in the color red. When this image is stitched to the RGB image, the red colors will appear salmon-red or pinkish. The reason is explained by the importance of the nuances and contrasts offered by the H-Alpha filter which helps to attenuate the red color (as well as the other colors), making it appear salmon or pink. We can explain it in large part by the bar of tones of the color red here:

This red color tone bar was produced from an 8 bit image. It brings out the tones of the color red from 0 (black) to 255 (white). Between these two extremes, we can appreciate the different tones of the color red. When stitching the H-Alpha image, the red colors are toned down or shifted to the right (instead of the center). This leads to the appearance of this famous pink color, which makes enthusiasts swear so much who use the H-Alpha filter as a luminance image to produce their color image according to the LRGB technique described in this site. It should be noted that the tone bar largely explains the problem, because there is also a mutation from the color red to the color salmon thus offering a pinkish-salmon color!
Here is the presentation of two techniques to correct this problem:
- (Ha + R) - (Ha + R) VB
- Ha (HaRGB) with manual color correction
1- (Ha + R) - (Ha + R) VB
Following several readings and research on the Web, here is one of the best techniques to correct the color red-salmon. Before performing this technique, the following parameters must be respected:
- All images (Ha RV and B) must be taken in Bin 1 × 1 to keep the same resolution or sharpness of the final image
- All individual images must have the same exposure time to maintain the same Signal-to-Noise (S / N) ratio thus allowing a match between each color layer
- The same number of images must be produced for each of the filters to also keep the same Signal / Noise (S / N) ratio between the different layers Ha RV and B
Instead of stitching the RV and B layers together to produce the color image, we are going to merge the image H-Alpha with the picture Red with Photoshop:
- All images have been preprocessed and assembled. See the flow chart of the LRGB image preprocessing for more details
- All images were converted to 16-bit TIF format using FIT Liberator software. Images are already aligned with each other
- Open both images H-Alpha et Red in Photoshop
- Copy paste the image H-Alpha above the image Red
- Rename the layer H-Alpha stuck for H-Alpha Luminance
- Click on the layer H-Alpha Luminance and choose the blend mode Lighten (Lighten)
- Save the stitched image in the name Ha + R for example
By choosing the blend mode Lighten (instead of Brightness), it fetch all the signal from the image H-Alpha of the nebula and, at the same time, to let through all the signal of the image Red for the stars.
The image Ha + R thus produced will be used as a replacement for the image Red to create the color image (Ha + R) VB. For more details on the treatment, see the LRGB Image Routing Graph and follow the right section for pictures red, Green et Blue. Go to the end of the process just before assembling the Luminance and RGB image.
It remains to use this image Ha + R (monochrome) as image of Luminance and assemble it with the color image (Ha + R) VB. For details on stitching the image of Luminance with the picture RGB, To see the LRGB Image Routing Graph and follow the left section regarding the image of Luminance. Go until the end of the process.
We have just created an image (Ha + R) - (Ha + R) VB which presents all the nuances of the nebula with more natural colors as much for the nebula as the stars and thus correct or attenuate the red-salmon color of the nebula.
To see examples of images produced with this technique as well as other variations in the process, see the website section of Robert gendler (in English) dealing with this topic.
2- Ha (HaRGB) with manual color correction
When the H-Alpha Luminance image is produced in Bin 1 × 1 and the RGB images in Bin 2 × 2, the technique presented above will not give good results, as the final image will no longer be in focus. same resolution. The stars will be blurrier and larger, presenting a lower resolution image. If the number of images per layer is different, for example ten images for the H-Alpha channel and less than five images for each of the RGB layers, the Signal-to-noise ratio will be lower for the RGB images, presenting a more color image. noisy and thus of lower quality.
To overcome all these problems, it is therefore necessary to keep the H-Alpha image as a luminance image in the case mentioned above (H-Alpha in Bin 1 × 1 and RGB in Bin 2 × 2). By overlaying this Ha luminance image over the traditional RGB image, all of the detail and depth (the S / N ratio) of the H-Alpha image will be preserved in the resulting HaRGB color image. On the other hand, by reverting to a standard HaRGB image, there will remain a dominant salmon-red in the image.
Here is the procedure (with Photoshop) to correct (or attenuate) the salmon-red color of the nebulae produced with the traditional technique. LRGB :
- This process is introduced immediately after assembling the luminance image H-Alpha with the picture RGB
- Here is the red color tone bar which will be used to control the adjustments:

- To present the stars more natural and to avoid a star mismatch between the image H-Alpha et RGB (the image H-Alpha dims the stars and thus presents them smaller than those in the image RGB), do the following:
- The luminance image is in Brightness with a Opacity by 100%
- Add a Gaussian blur of at least 5 pixels to the image RGB in order to make the smaller stars disappear and to blur the bigger ones. At the same time, we will remove the noise from the RGB image
- By doing so, the stars in the image H-Alpha will pass through the image RGB. In addition, the star size mismatch will disappear.
- Create a layer Curves, above the layers of H-Alpha Luminance et RGB, and increase the red layer and decrease the blue layer based on the following example:

- The correction is made above the black point (20) and below the white point (245). The amplitude of the curves varies from one image to another. The red curve will amplify the red color slightly while the blue curve will mutate the salmon color to the orange tones, which will help the following process to bring out the red colors of the nebula.
- Create a layer Hue / Saturation
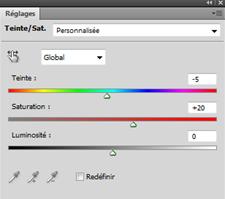
- Adjust the Hue and Saturation of the Global channel as follows:

- By setting the hue to a value -5, this makes the image appear redder (mutation of the color orange to red). Then, by increasing the saturation of all colors to +20, we correct the loss of color caused by the overlay of the layer. H-Alpha on the image RGB (we thus move the tones of the color red to the left in the bar of tones of this color). Note that these parameters may vary from image to image. When making adjustments, always compare the red colors in the image with the tone bar of that color.
Here is the presentation of the Veil Nebula (NGC6992) image before and after the above treatment:
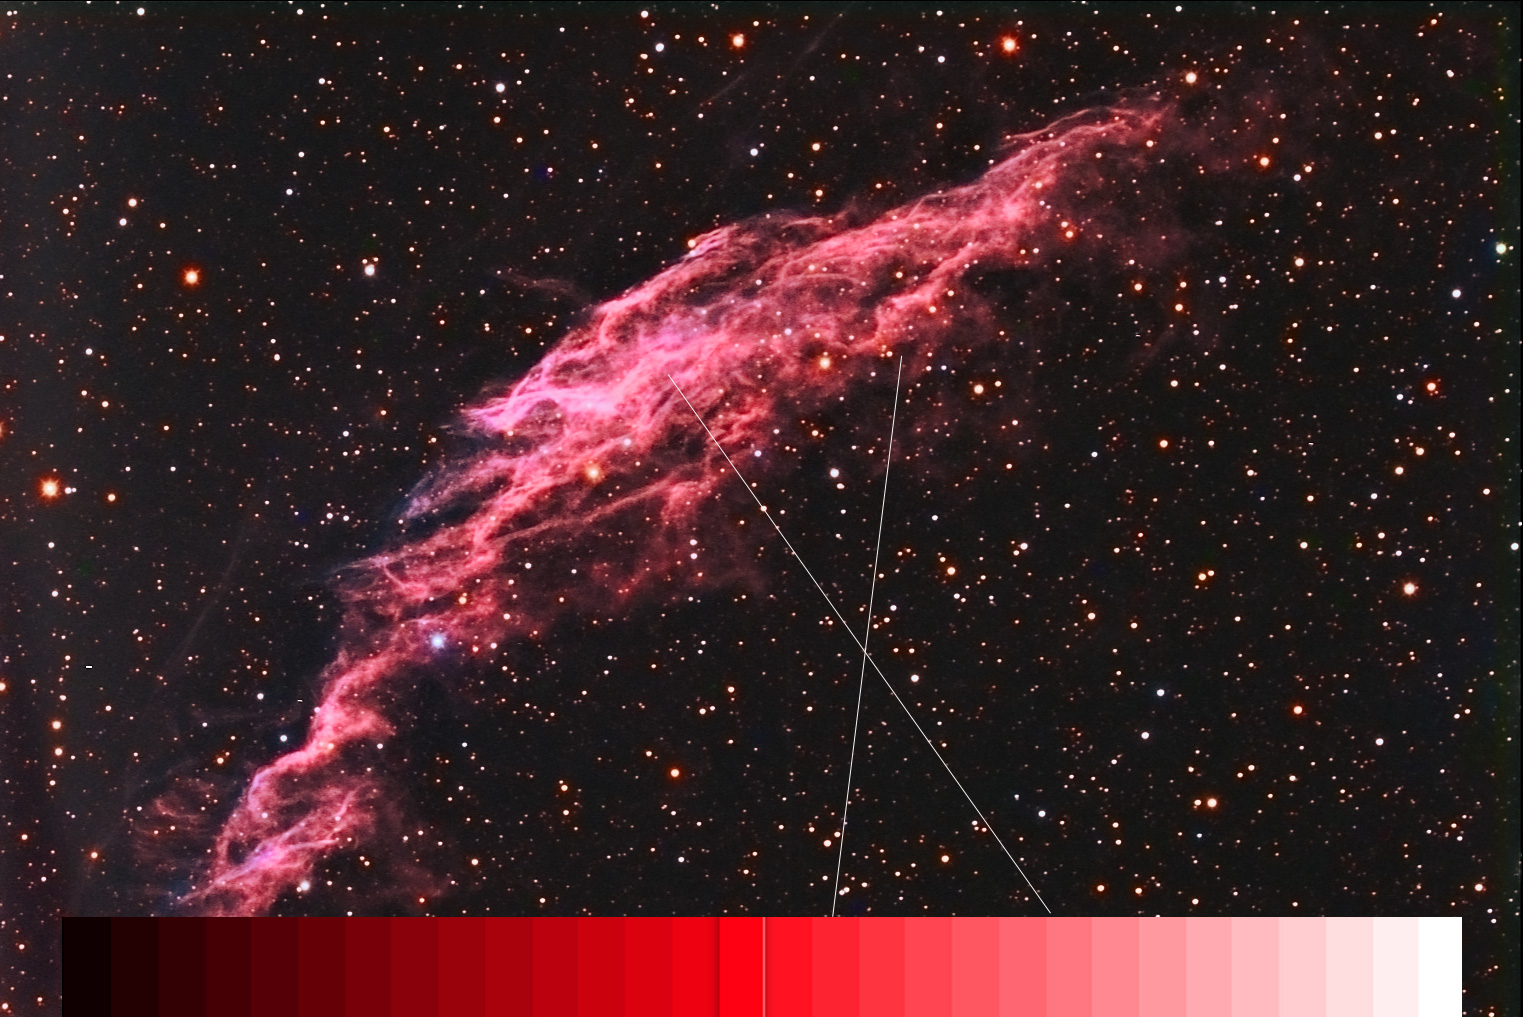
By comparing the two images with the red color tone bar, we see the following on the corrected image:
- The tones of the red color in the corrected image are closer to those of the tone bar
- There is a shift of the tones to the left, thus making the image appear redder
- Some observers will say that there is still a pink color in the image. It should be considered that this veil gives very subtle and pale colors. Look at the tone bar for the color red, a pale red to a pinkish appearance

Here is the corrected image with a direct comparison with the tone bar of the color red. We can appreciate that the different red tones of the nebula correspond to those of the tone bar. The exposure times are: H-Alpha (10 x 5 'bin 1 × 1), RGB (3 x 2' bin 2 × 2 each).
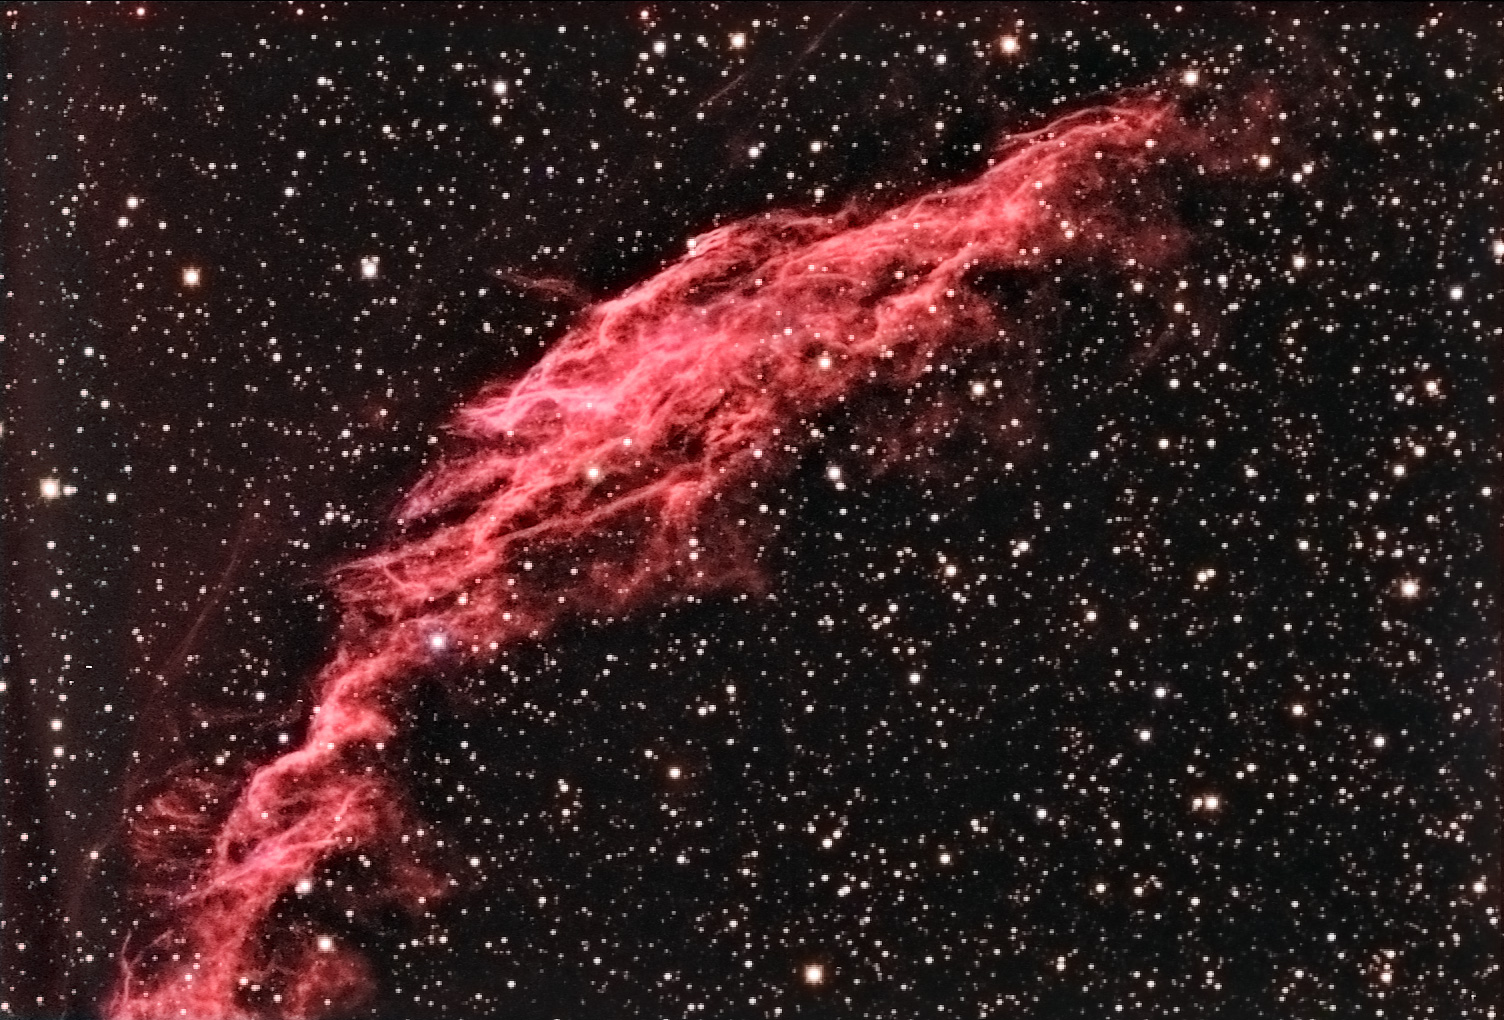
Here is the treatment (Ha + R) - (Ha + R) VB of this nebula with the same exposure times:

Due to the mixing of the H-Alpha layer (10 x 5 'bin 1 × 1) with the red image (3 x 2' bin 2 × 2), we can observe the following problems on this image:
- The stars are more blurry and larger for the reason that the Red image is in a 2 × 2 bin (it should also be noted that the H-Alpha layer helps to attenuate the stars, but the images in 2 × 2 bin also increase the star size in a factor of 4)
- Due to the merging of the H-Alpha image with the Red image, the image resolution (sharpness) is reduced due to the red image which is in 2 × 2 bin
- The image is more noisy, because the Red image which is mixed with the H-Alpha channel has a lower S / N ratio than the H-Alpha image due to the compositing of fewer images (3 images for the H-Alpha channel Red and 10 images for the H-Alpha layer)
- As the H-Alpha layer has more depth than the other layers, there is a significant attenuation of the other colors. Here the blue has completely disappeared
In short, so that the technique (Ha + R) - (Ha + R) VB works well, you have to take the images with the same parameters as the image H-Alpha : H-Alpha (12 x 5 'bin 1 × 1) and RGB (12 x 5' bin 1 × 1 each). If your images RGB are in Bin 2 × 2, use the second technique (Ha(HaRGB) with manual color correction).
Richard Beauregard
Sky Astro - CCD
Revised 2021/01/16
